Introduction
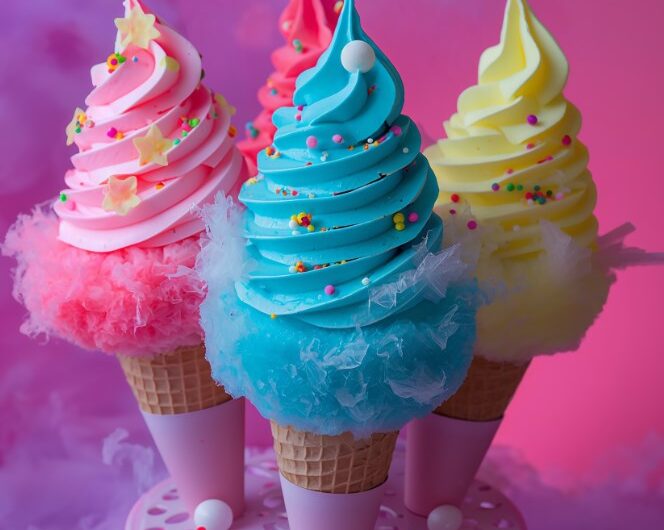
Glow-in-the-Dark Cotton Candy Cones are a fun, vibrant treat that adds a magical touch to any party. Soft, fluffy, and colorful, these cotton candy cones are designed to glow under blacklight, making them a showstopper for Halloween, glow parties, or carnival-themed events.
This recipe combines the nostalgia of classic carnival cotton candy with a modern, glowing twist. It’s visually stunning, fun to eat, and perfect for impressing guests of all ages. Plus, you can customize colors and flavors to match your party theme.
Why I Love This Recipe
I love this recipe because it’s creative, interactive, and visually spectacular. The cotton candy is soft and airy, and when paired with glowing sticks or UV-reactive sugar, it becomes a playful centerpiece. Kids (and adults!) love the theatrical element of glowing, swirling candy. It’s both a treat and a conversation starter.
It’s also versatile—you can make it for Halloween, birthday parties, or any celebration where a little magic is needed.
Why It’s a Must-Try Dish
- Magical presentation – Glows under blacklight for wow factor.
- Sweet and fluffy – Classic cotton candy texture that everyone loves.
- Customizable – Colors and flavors can be mixed.
- Interactive – Kids can watch it being made or help assemble.
- Perfect for themed parties – Adds fun and excitement to any dessert table.
Recipe Information
- Preparation Time: 20 minutes
- Cooking Time: 10–15 minutes (for cotton candy spinning)
- Total Time: ~35 minutes
- Servings: 8 cones
- Calories per serving: ~150 kcal
- Course: Dessert / Snack
- Cuisine: American
Ingredients
- 2 cups granulated sugar
- ½ cup light corn syrup
- ½ cup water
- ½ tsp glow-in-the-dark or UV-reactive food coloring (or neon food coloring for blacklight effect)
- 1 tsp flavored extract (vanilla, strawberry, or any preferred)
- 8 paper or plastic cones
- Optional: UV glow sticks (for display, not edible)
Step-by-Step Preparation Method
Step 1: Prepare Your Work Area
- Set up a cotton candy machine according to the manufacturer’s instructions.
- Place cones and small bowls nearby for assembly.
- Optional: Dim lights or set up blacklight to preview glow effect.
Step 2: Make the Sugar Mixture
- In a saucepan, combine sugar, corn syrup, and water.
- Heat over medium heat until sugar dissolves and mixture reaches 320°F (160°C) (hard-crack stage).
- Remove from heat and stir in flavor extract and UV-reactive food coloring.
Step 3: Spin the Cotton Candy
- Pour the sugar mixture into the cotton candy machine.
- Spin according to manufacturer instructions until fluffy threads form.
Step 4: Assemble the Cones
- Take a cone and gently twirl it under the spinning sugar to collect cotton candy.
- Continue adding sugar until the cone is full and fluffy.
- For added glow effect, position UV glow sticks around the base (do not insert into candy).
Step 5: Serve
- Serve immediately for best fluffiness.
- Display under blacklight for a magical glow.
How to Serve
- Arrange on a dessert table with blacklight for glow effect.
- Pair with other neon or Halloween treats.
- Serve individually wrapped for party favors.
Recipe Tips
- Make cotton candy just before serving; it deflates if stored too long.
- Use UV-reactive or neon sugar for glow effect—available at specialty stores or online.
- Handle cotton candy gently; moisture will make it sticky.
- For multi-colored cones, spin sugar threads in layers of different colors.
Variations
- Rainbow Glow Cones: Layer multiple colors of cotton candy for a rainbow effect.
- Flavored Glow Cones: Add flavored extracts like grape, cherry, or bubblegum.
- Spooky Halloween: Use orange and black cotton candy with glowing sticks for eerie effect.
- Mini Cones: Make small individual cones for party platters or dessert tables.
Freezing & Storage
- Cotton candy is best served fresh; storing is not recommended as it will melt or harden.
- If necessary, store in airtight bags for a few hours in a dry, cool place.
- Do not refrigerate or freeze, as humidity will ruin texture.
Special Equipment Needed
- Cotton candy machine
- Candy thermometer
- Paper or plastic cones
- UV glow sticks (optional, for visual effect)
FAQ
Q1: Can I make these without a cotton candy machine?
Making cotton candy without a machine is extremely difficult. For best results, use a cotton candy machine.
Q2: Is the glowing effect edible?
No, UV glow sticks are only for display. The food coloring used in sugar is safe and edible.
Q3: How long does cotton candy last?
Best served immediately; it may last 1–2 hours in airtight conditions, but it will deflate and become sticky.
Q4: Can kids help make these?
Yes! Children can help assemble the cones under supervision, but the machine should be handled by adults.
Q5: Can I mix multiple colors in one cone?
Absolutely! Layer threads of different colors for a rainbow or neon effect.
Conclusion
Glow-in-the-Dark Cotton Candy Cones are a whimsical and festive treat that adds magic to any party. With their airy sweetness, vibrant neon colors, and glowing presentation under blacklight, they’re a surefire way to impress guests. Perfect for Halloween, glow parties, or carnival-themed events, these cotton candy cones combine fun, creativity, and deliciousness in every bite.
Glow-in-the-Dark Cotton Candy Cones
Course: DessertsCuisine: AmericanDifficulty: easy8
servings20
minutes15
minutes35
minutesIngredients
2 cups granulated sugar
½ cup light corn syrup
½ cup water
½ tsp glow-in-the-dark or UV-reactive food coloring (or neon food coloring for blacklight effect)
1 tsp flavored extract (vanilla, strawberry, or any preferred)
8 paper or plastic cones
Optional: UV glow sticks (for display, not edible)
Directions
- Step 1: Prepare Your Work Area: Set up a cotton candy machine according to the manufacturer’s instructions. Place cones and small bowls nearby for assembly. Optional: Dim lights or set up blacklight to preview glow effect.
- Step 2: Make the Sugar Mixture: In a saucepan, combine sugar, corn syrup, and water. Heat over medium heat until sugar dissolves and mixture reaches 320°F (160°C) (hard-crack stage). Remove from heat and stir in flavor extract and UV-reactive food coloring.
- Step 3: Spin the Cotton Candy: Pour the sugar mixture into the cotton candy machine. Spin according to manufacturer instructions until fluffy threads form.
- Step 4: Assemble the Cones: Take a cone and gently twirl it under the spinning sugar to collect cotton candy. Continue adding sugar until the cone is full and fluffy. For added glow effect, position UV glow sticks around the base (do not insert into candy).
- Step 5: Serve: Serve immediately for best fluffiness. Display under blacklight for a magical glow.


