There’s something universally comforting about the combination of apples and cinnamon. Whether it’s the scent wafting through the kitchen or the first forkful of buttery crust and sweet, spiced fruit, a Cinnamon Apple Tart offers a sensory experience like no other.
Elegant in appearance but simple at heart, this tart is the perfect dessert to bridge casual weeknight dinners and sophisticated holiday gatherings.
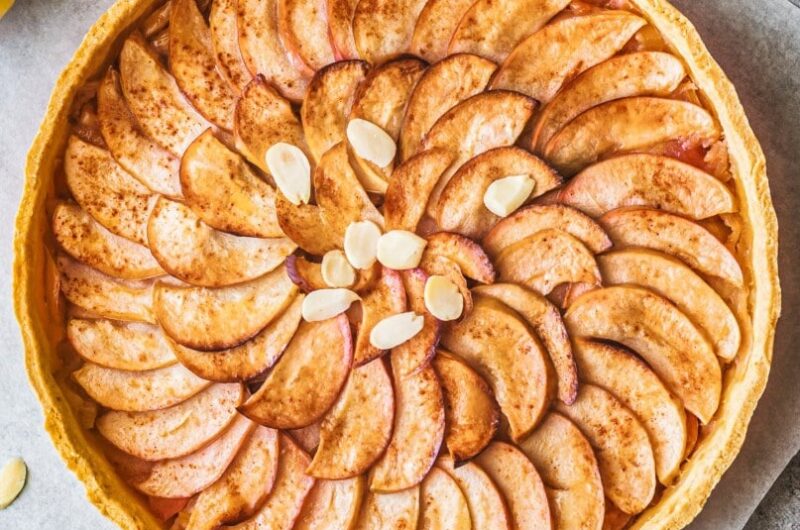
Rooted in classic French baking, the apple tart balances sophistication and rustic charm. Unlike an American apple pie, this tart is open-faced, beautifully showcasing thinly sliced apples fanned in concentric circles over a thin layer of cinnamon-sugar filling and buttery crust.
Why I Love This Recipe
What I love most about this tart is that it strikes the perfect balance between beauty and simplicity. It looks impressive enough to serve at a dinner party, but it’s incredibly easy to put together—especially if you use a store-bought tart shell or pastry dough. Plus, the natural sweetness of the apples means you don’t need loads of added sugar, and the aroma of cinnamon makes the entire house smell like a bakery.
This tart is also versatile: enjoy it warm with ice cream, cold with coffee, or even as a decadent breakfast. And let’s not forget—it’s one of those rare desserts that feels both indulgent and wholesome.
Prep & Cook Time
- Preparation Time: 25 minutes
- Baking Time: 40–45 minutes
- Total Time: 1 hour 10 minutes
- Servings: 8
- Calories per Serving: ~300–350 kcal (varies depending on crust and sugar used)
Ingredients
For the crust (use homemade or store-bought):
1 9-inch tart shell (or 1 sheet of puff pastry, rolled into a 9-inch circle)
Homemade crust:
1 1/4 cups all-purpose flour
1/2 cup (1 stick) cold unsalted butter, cubed
2–3 tbsp ice water
1 tbsp sugar
Pinch of salt
For the filling:
- 3–4 medium apples (Granny Smith, Honeycrisp, or Fuji work great)
- 2 tbsp unsalted butter, melted
- 1/4 cup brown sugar or granulated sugar
- 1 tsp ground cinnamon
- 1/4 tsp ground nutmeg (optional)
- 1/2 tsp vanilla extract
- 1 tbsp lemon juice
- 1 tbsp all-purpose flour (for sprinkling over crust to absorb juice)
Optional glaze:
- 2 tbsp apricot jam or honey (for a shiny finish)
- 1 tsp water
Directions
Step 1: Prepare the Tart Crust
If using homemade crust:
- In a bowl, combine flour, sugar, and salt. Add cubed butter and cut into the flour using a pastry cutter or fingers until crumbly.
- Add ice water one tablespoon at a time, mixing gently until the dough comes together.
- Form into a disc, wrap in plastic, and chill for 30 minutes.
- Roll out to fit a 9-inch tart pan. Press into the pan and trim the edges. Chill again for 10 minutes.
If using store-bought pastry:
Roll it out to a 9-inch circle and fit into a tart pan or place on a parchment-lined baking sheet for a galette-style tart.
Step 2: Prepare the Apples
- Peel, core, and thinly slice apples (about 1/8 inch thick).
- Toss with lemon juice, vanilla, cinnamon, nutmeg, and sugar. Let them sit for 10 minutes to release juices.
Step 3: Assemble the Tart
- Preheat oven to 375°F (190°C).
- Sprinkle the tart crust lightly with flour to absorb extra moisture.
- Arrange the apple slices in overlapping circles, starting from the outside and working inwards.
- Brush with melted butter and drizzle any remaining cinnamon-sugar mixture over the top.
Step 4: Bake
- Bake for 40–45 minutes, or until the apples are tender and the crust is golden.
- If using a galette (free-form), make sure to fold the edges of the crust up slightly over the apples.
Step 5: Glaze (Optional but Recommended)
Heat apricot jam and water in the microwave or on the stovetop until melted.
- Brush gently over the warm tart for a glossy finish.
Tips for Success
- Slice apples evenly for even baking and a polished look.
- Don’t overfill the tart—less is more to prevent sogginess.
- Chill the dough after pressing it into the pan to reduce shrinking.
- Use a mix of apples for balanced sweet-tart flavor.
- Cover edges with foil if browning too quickly during baking.
Variations
- Rustic Galette Style: Use puff pastry or pie dough and fold the edges over the apples for a no-fuss, free-form tart.
- Add caramel: Drizzle with salted caramel sauce for extra indulgence.
- Frangipane base: Spread almond cream under the apples for a classic French touch.
- Add nuts: Sprinkle sliced almonds or chopped pecans on top before baking.
- Gluten-Free Version: Use a gluten-free pastry dough or almond flour crust.
Serving Suggestions
- Serve warm with vanilla ice cream or whipped cream.
- Enjoy cold with your morning coffee or tea.
- Pair with a drizzle of caramel or maple syrup for added richness.
- Add a scoop of cinnamon or salted caramel gelato for gourmet flair.
- Garnish with a dusting of powdered sugar or fresh mint for a festive touch.
Conclusion
The Cinnamon Apple Tart is the ultimate dessert for showcasing the beauty of seasonal apples. It’s simple, elegant, and bursting with warm, comforting flavors. Whether you’re baking for family, friends, or just to satisfy a personal craving, this tart delivers every time. It’s a must-try for apple dessert lovers and a wonderful recipe to keep in your seasonal rotation. Once you master this tart, you’ll find yourself coming back to it again and again.
Frequently Asked Questions (FAQs)
Q: What apples work best for this tart?
A: A combination of Granny Smith (tart) and Honeycrisp or Fuji (sweet) gives the best balance of flavor and texture.
Q: Can I make it ahead of time?
A: Yes! It keeps well at room temperature for a day, or in the fridge for up to 3 days. Warm slightly before serving.
Q: Can I freeze the tart?
A: Yes, the baked tart can be frozen. Wrap tightly and freeze for up to 2 months. Reheat in a 325°F oven until warmed through.
Q: Do I have to peel the apples?
A: Peeling is recommended for a tender texture, but you can leave the skin on for a more rustic feel and added fiber.
Q: Can I use a premade pie crust?
A: Absolutely. It saves time and still gives you a delicious result.
Cinnamon Apple Tart Recipe
Course: Desserts8
servings25
minutes45
minutes1
hour10
minutesIngredients
- For the crust (use homemade or store-bought):
1 9-inch tart shell (or 1 sheet of puff pastry, rolled into a 9-inch circle)
- Homemade crust:
1 1/4 cups all-purpose flour
1/2 cup (1 stick) cold unsalted butter, cubed
2–3 tbsp ice water
1 tbsp sugar
Pinch of salt
- For the filling:
3–4 medium apples (Granny Smith, Honeycrisp, or Fuji work great)
2 tbsp unsalted butter, melted
1/4 cup brown sugar or granulated sugar
1 tsp ground cinnamon
1/4 tsp ground nutmeg (optional)
1/2 tsp vanilla extract
1 tbsp lemon juice
1 tbsp all-purpose flour (for sprinkling over crust to absorb juice)
- Optional glaze:
2 tbsp apricot jam or honey (for a shiny finish)
1 tsp water
Directions
- Prepare the Tart Crust, If using homemade crust: In a bowl, combine flour, sugar, and salt. Add cubed butter and cut into the flour using a pastry cutter or fingers until crumbly. Add ice water one tablespoon at a time, mixing gently until the dough comes together. Form into a disc, wrap in plastic, and chill for 30 minutes. Roll out to fit a 9-inch tart pan. Press into the pan and trim the edges. Chill again for 10 minutes. If using store-bought pastry: Roll it out to a 9-inch circle and fit into a tart pan or place on a parchment-lined baking sheet for a galette-style tart.
- Prepare the Apples Peel, core, and thinly slice apples (about 1/8 inch thick). Toss with lemon juice, vanilla, cinnamon, nutmeg, and sugar. Let them sit for 10 minutes to release juices.
- Assemble the Tart Preheat oven to 375°F (190°C). Sprinkle the tart crust lightly with flour to absorb extra moisture. Arrange the apple slices in overlapping circles, starting from the outside and working inwards. Brush with melted butter and drizzle any remaining cinnamon-sugar mixture over the top.
- Bake Bake for 40–45 minutes, or until the apples are tender and the crust is golden. If using a galette (free-form), make sure to fold the edges of the crust up slightly over the apples.
- Glaze (Optional but Recommended) Heat apricot jam and water in the microwave or on the stovetop until melted. Brush gently over the warm tart for a glossy finish.