

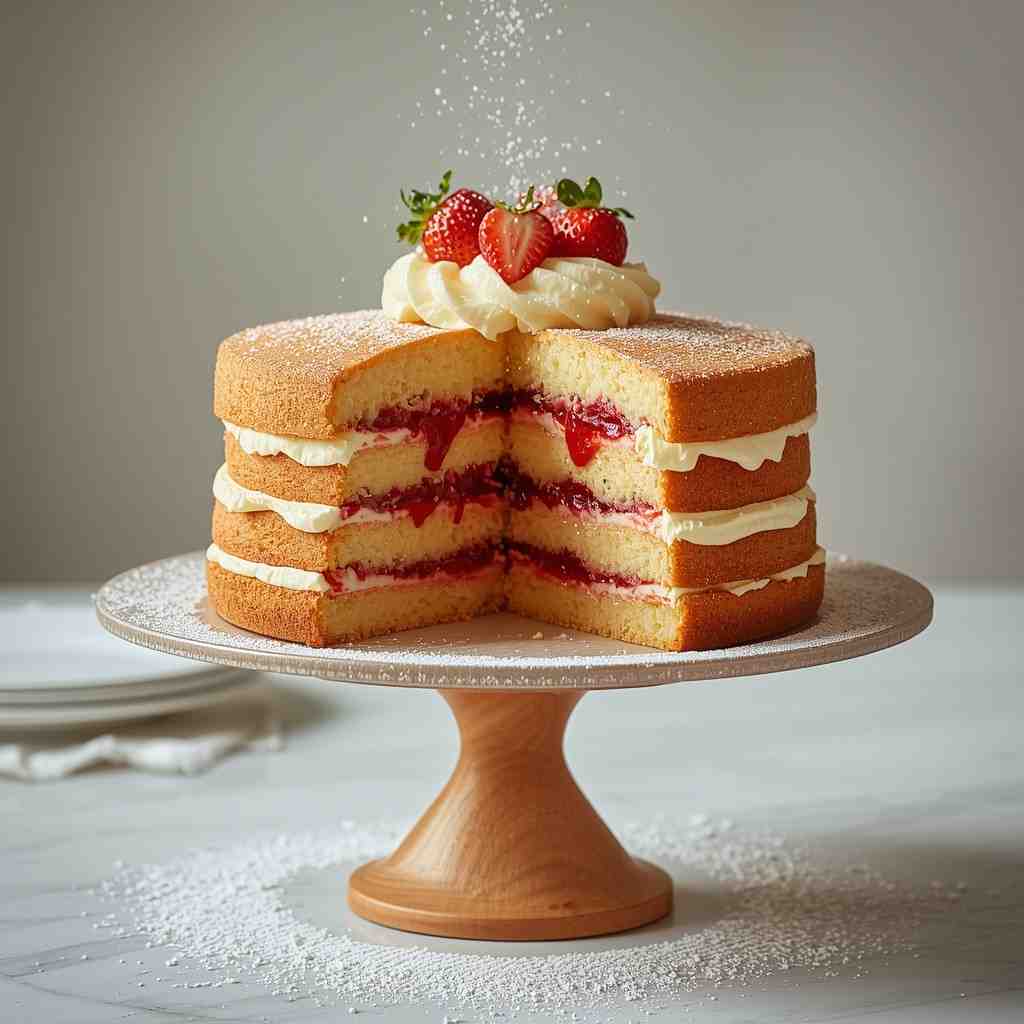
The Classic Victoria Sponge Cake, named after Queen Victoria herself, is a timeless British favorite that beautifully balances simplicity and elegance. It’s made with two soft, buttery sponge layers sandwiched together with sweet strawberry jam and a generous layer of whipped cream or buttercream.
Light, fluffy, and perfectly golden, this cake is a symbol of afternoon tea tradition — delicate yet indulgent.
Every bite brings the perfect harmony of airy sponge, fruity sweetness, and creamy richness. It’s the kind of cake that never goes out of style and evokes pure nostalgia with every forkful.
Why I Love This Recipe
I love the Classic Victoria Sponge Cake because it embodies the charm of home baking — simple ingredients, a delightful aroma, and a soft, tender crumb. There’s something deeply comforting about watching the golden layers rise in the oven and spreading on that thick layer of jam and cream.
It’s also wonderfully versatile — you can make it for birthdays, tea parties, brunches, or even as a light dessert after dinner. This cake is understated perfection: it doesn’t rely on fancy frostings or decorations, just the pure flavor of butter, eggs, and love.
Why It’s a Must-Try Dish
This cake is a must-try for anyone who appreciates classic baking at its finest. It’s incredibly simple to prepare yet yields bakery-quality results every single time. The sponge is feather-light, the jam adds fruity sweetness, and the cream gives that luscious finish.
Whether you’re new to baking or a seasoned pro, this recipe never fails — it’s the perfect example of how a few quality ingredients can create something absolutely divine.
Preparation and Cooking Time
- Preparation Time: 20 minutes
- Cooking Time: 25 minutes
- Total Time: 45 minutes
- Servings: 8–10 slices
- Calories: Approximately 320 kcal per slice
Cuisine and Course
- Cuisine: British
- Course: Dessert / Afternoon Tea Cake
Ingredients
For the Sponge:
- 200 g (1 cup) unsalted butter, softened
- 200 g (1 cup) caster sugar
- 4 large eggs (room temperature)
- 200 g (1 ⅔ cups) self-raising flour, sifted
- 1 teaspoon baking powder
- 2 tablespoons milk
- 1 teaspoon pure vanilla extract (optional but lovely for aroma)
For the Filling:
- 100 g (about ⅓ cup) strawberry or raspberry jam
- 150 ml (⅔ cup) heavy whipping cream (or buttercream, if preferred)
- 1 tablespoon icing sugar (for sweetening whipped cream)
For Decoration:
- Icing sugar, for dusting the top
Simple Cooking Directions
- Preheat oven and prepare two round cake tins.
- Cream together butter and sugar until light and fluffy.
- Add eggs one at a time, mixing well after each.
- Fold in sifted flour and baking powder gently.
- Add milk and vanilla for a smooth batter.
- Divide batter between tins and bake until golden.
- Cool, then sandwich with jam and whipped cream.
- Dust with icing sugar before serving.
Step-by-Step Recipe Preparation Method
Step 1: Preheat and Prepare
- Preheat your oven to 180°C (350°F).
- Grease and line two 8-inch (20 cm) round cake tins with parchment paper.
Step 2: Cream the Butter and Sugar
- In a large bowl, beat the butter and sugar together using an electric mixer or hand whisk until pale, creamy, and fluffy. This step traps air, giving your sponge its signature lightness.
Step 3: Add the Eggs
- Beat in the eggs one at a time. If the mixture curdles, add a spoonful of flour to bring it back together.
Step 4: Fold in Dry Ingredients
- Sift the self-raising flour and baking powder into the bowl.
- Gently fold the dry ingredients into the wet mixture using a spatula until just combined.
Step 5: Add Milk and Vanilla
- Stir in milk and vanilla extract for a soft, dropping consistency batter — it should fall off the spoon slowly when lifted.
Step 6: Bake the Sponges
- Divide the batter evenly between the two prepared tins and smooth the tops.
- Bake for 20–25 minutes, or until golden and a skewer inserted into the center comes out clean.
Step 7: Cool the Cakes
- Let the cakes cool in their tins for 5 minutes, then transfer them to a wire rack to cool completely.
Step 8: Prepare the Filling
- Whip the cream with icing sugar until soft peaks form (or prepare buttercream if you prefer).
Step 9: Assemble the Cake
- Place one sponge on a serving plate.
- Spread the jam evenly over the surface, followed by a thick layer of whipped cream.
- Gently place the second sponge on top.
Step 10: Finishing Touch
- Lightly dust the top with icing sugar for a classic look.
How to Serve This Recipe
Serve your Classic Victoria Sponge Cake:
- Fresh at room temperature, ideally within a few hours of assembling.
- With a hot cup of English tea or coffee for a perfect afternoon treat.
- Decorate with fresh berries or mint sprigs if serving for a special occasion.
Slice generously and serve with a smile — it’s elegance in simplicity.
Additional Recipe Tips
- Make sure all ingredients are at room temperature before starting.
- Don’t overmix the batter — it can make the sponge dense.
- Use good-quality jam (preferably homemade or seedless) for best flavor.
- Allow cakes to cool completely before adding cream or jam, or they’ll melt.
- If using buttercream instead of whipped cream, you can prepare the cake a day in advance.
Variations
- Lemon Victoria Sponge:
Add zest of 1 lemon to the batter and fill with lemon curd instead of jam. - Chocolate Version:
Replace 2 tablespoons of flour with cocoa powder and fill with chocolate ganache. - Berry Layer Cake:
Add sliced strawberries, raspberries, or blueberries between the layers for freshness. - Vegan Option:
Use plant-based butter, non-dairy milk, and a flaxseed “egg” substitute. - Mini Victoria Sponges:
Bake in muffin tins for individual mini cakes — perfect for parties or picnics!
Freezing and Storage
- Storage: Keep at room temperature for up to 2 days in an airtight container (without cream).
If filled with whipped cream, refrigerate and consume within 24 hours. - Freezing:
- You can freeze the unfilled sponge layers for up to 2 months.
- Wrap each layer tightly in plastic wrap and freeze flat.
- Thaw completely before filling and assembling.
Special Equipment Needed
- 2 x 8-inch round cake tins
- Electric hand mixer or stand mixer
- Spatula
- Parchment paper
- Cooling rack
- Sieve for dusting icing sugar
Frequently Asked Questions (FAQ)
Q1. Can I use all-purpose flour instead of self-raising flour?
Yes! Use all-purpose flour and add 2 teaspoons of baking powder for every 200 g (1 ⅔ cups) of flour.
Q2. Can I make this cake gluten-free?
Absolutely — just use a good quality gluten-free self-raising flour blend.
Q3. What’s the best jam to use?
Strawberry or raspberry jam are the traditional favorites, but you can experiment with apricot or cherry.
Q4. Can I use buttercream instead of whipped cream?
Yes! Buttercream is more stable, especially for warm weather or longer storage.
Q5. How can I make the cake extra moist?
Add an extra tablespoon of milk or a tablespoon of sour cream to the batter.
Conclusion
The Classic Victoria Sponge Cake is the queen of cakes — light, elegant, and timeless. With its fluffy sponge layers, sweet jam, and velvety cream, it captures everything wonderful about traditional British baking.
Perfect for tea time, celebrations, or just a cozy afternoon treat, this cake reminds us that sometimes the simplest recipes are the most satisfying. Every slice is a taste of comfort, history, and home-baked love.
Classic Victoria Sponge Cake
Course: DessertsCuisine: BritishDifficulty: Easy8
servings20
minutes25
minutes45
minutesIngredients
For the Sponge:
200 g (1 cup) unsalted butter, softened
200 g (1 cup) caster sugar
4 large eggs (room temperature)
200 g (1 ⅔ cups) self-raising flour, sifted
1 teaspoon baking powder
2 tablespoons milk
1 teaspoon pure vanilla extract (optional but lovely for aroma)
For the Filling:
100 g (about ⅓ cup) strawberry or raspberry jam
150 ml (⅔ cup) heavy whipping cream (or buttercream, if preferred)
1 tablespoon icing sugar (for sweetening whipped cream)
For Decoration:
Icing sugar, for dusting the top
Directions
- Step 1: Preheat and Prepare : Preheat your oven to 180°C (350°F). Grease and line two 8-inch (20 cm) round cake tins with parchment paper.
- Step 2: Cream the Butter and Sugar : In a large bowl, beat the butter and sugar together using an electric mixer or hand whisk until pale, creamy, and fluffy. This step traps air, giving your sponge its signature lightness.
- Step 3: Add the Eggs : Beat in the eggs one at a time. If the mixture curdles, add a spoonful of flour to bring it back together.
- Step 4: Fold in Dry Ingredients : Sift the self-raising flour and baking powder into the bowl. Gently fold the dry ingredients into the wet mixture using a spatula until just combined.
- Step 5: Add Milk and Vanilla : Stir in milk and vanilla extract for a soft, dropping consistency batter — it should fall off the spoon slowly when lifted.
- Step 6: Bake the Sponges : Divide the batter evenly between the two prepared tins and smooth the tops. Bake for 20–25 minutes, or until golden and a skewer inserted into the center comes out clean.
- Step 7: Cool the Cakes : Let the cakes cool in their tins for 5 minutes, then transfer them to a wire rack to cool completely.
- Step 8: Prepare the Filling : Whip the cream with icing sugar until soft peaks form (or prepare buttercream if you prefer).
- Step 9: Assemble the Cake : Place one sponge on a serving plate. Spread the jam evenly over the surface, followed by a thick layer of whipped cream. Gently place the second sponge on top.
- Step 10: Finishing Touch : Lightly dust the top with icing sugar for a classic look.