Introduction
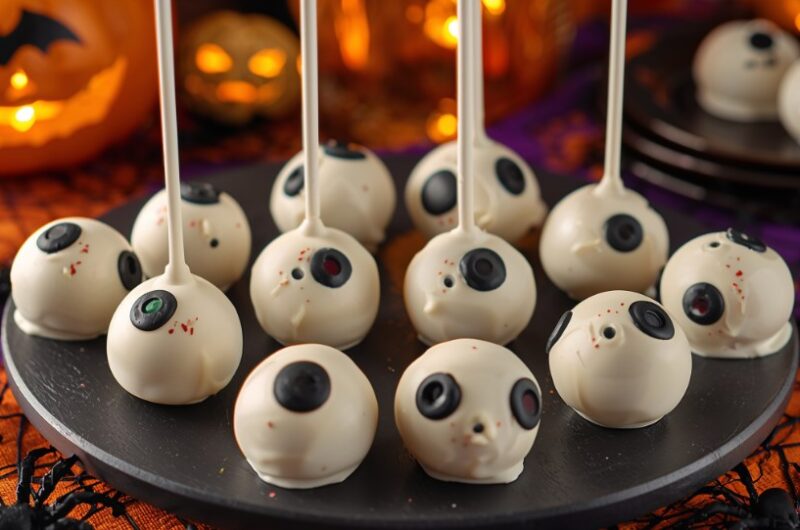
Halloween is the perfect time to let your creativity run wild in the kitchen, and these Creepy Eyeball Cake Pops are a fantastic way to add some spooky charm to your dessert table. They’re moist, bite-sized cake balls coated in chocolate or candy melts, then decorated to look like eerie eyeballs with colorful irises, dark pupils, and even “bloodshot” details.
Not only do they taste delicious, but they also double as edible decorations that are sure to impress at parties. Imagine a platter of blinking eyeballs staring back at your guests—it’s a Halloween dessert that’s as fun as it is frightfully festive!
Why I Love This Recipe
I adore this recipe because it’s a perfect balance of fun and flavor. Cake pops are already one of my favorite treats—they’re moist, sweet, and satisfying in just a few bites. When decorated as eyeballs, they become more than just dessert; they turn into conversation starters and centerpieces for Halloween gatherings.
Another reason I love this recipe is its versatility—you can play with colors, flavors, and decorations to create an endless variety of creepy eyeballs. It’s a hands-on, kid-friendly recipe that’s as much fun to make as it is to eat.
Why It’s a Must-Try Dish
- Spooky and Creative: Brings Halloween vibes to life.
- Moist & Delicious: Cake and frosting combo makes every bite rich and decadent.
- Party Perfect: Ideal finger food for kids’ parties or adult Halloween bashes.
- Customizable: Choose cake flavors, colors, and spooky designs.
- Family-Friendly Activity: Great recipe to decorate with kids.
Recipe Information
- Preparation Time: 35 minutes
- Cooking/Baking Time: 30 minutes (for cake)
- Decoration & Setting Time: 1 hour
- Total Time: ~2 hours
- Servings: 24 cake pops
- Calories per serving: ~190 kcal (approximate)
- Course: Dessert
- Cuisine: American
Ingredients
For the Cake Pops
- 1 box vanilla or chocolate cake mix (plus ingredients listed on the box)
- 1 cup frosting (vanilla, chocolate, or cream cheese)
For Coating and Decoration
- 2 cups white candy melts (for eyeball coating)
- ½ cup red candy melts or red gel icing (for bloodshot lines)
- ½ cup colored candy melts (blue, green, or brown for irises)
- ¼ cup black candy melts or black gel icing (for pupils)
- 24 lollipop sticks
- 1 tbsp vegetable oil (optional, for smoother chocolate melting)
Step-by-Step Preparation Method
Step 1: Bake the Cake
- Prepare cake mix as per package instructions.
- Bake and allow it to cool completely.
Step 2: Make Cake Balls
- Crumble cooled cake into fine crumbs in a large bowl.
- Add frosting gradually, mixing until dough-like and moldable.
- Roll mixture into 1-inch balls and place on a parchment-lined tray.
- Chill in the refrigerator for 30 minutes.
Step 3: Insert Sticks
- Melt a small amount of white candy melts.
- Dip one end of each stick into the melted chocolate, then insert into each cake ball (this helps secure the stick).
- Chill again for 10–15 minutes.
Step 4: Coat the Cake Pops
- Melt the white candy melts until smooth. Add a little vegetable oil if too thick.
- Dip each cake pop fully into the melted coating, allowing excess to drip off.
- Place upright in a cake pop stand or styrofoam block to set.
Step 5: Decorate the Eyeballs
- Use colored candy melts to create irises (dots on the center).
- Add black dots in the center for pupils.
- Pipe thin red lines with red candy melts or gel icing to create bloodshot veins.
- Allow cake pops to set completely.
How to Serve
- Display upright in a cake pop stand decorated with Halloween cobwebs.
- Serve on a platter with “bloody” red syrup drizzled for a scarier effect.
- Wrap individually in plastic for party favors.
Recipe Tips
- Always let cake pops fully chill before dipping to prevent crumbling.
- If candy melts are too thick, add a teaspoon of vegetable shortening or oil.
- For perfectly smooth eyeballs, gently tap sticks on the edge of the bowl after dipping.
- Use edible markers for more precise details.
Variations
- Flavor Twists: Try red velvet cake for an extra spooky “bloody” interior.
- Monster Eyes: Use neon green or purple candy melts instead of white for other creepy creatures.
- Stuffed Eyeballs: Hide candy or sprinkles inside cake balls before rolling.
- Glow Effect: Dust with edible glitter for glowing, magical eyeballs.
Freezing & Storage
- Room Temperature: Best eaten within 2 days if stored in an airtight container.
- Refrigerator: Keeps for up to 5 days in an airtight container.
- Freezer: Store undecorated cake balls (without coating) for up to 1 month. Thaw before dipping and decorating.
Special Equipment Needed
- Lollipop sticks
- Microwave-safe bowls
- Parchment paper
- Cake pop stand or styrofoam block
- Piping bags (or zip-top bags with tips cut off)
FAQ
Q1: Can I use homemade cake instead of a box mix?
Yes! Any cake recipe works, as long as it’s moist enough to crumble with frosting.
Q2: Can I skip the frosting?
No, frosting binds the crumbs together. Without it, cake balls may fall apart.
Q3: How do I keep the coating smooth?
Work with melted candy melts in small batches and add a little oil if too thick.
Q4: Can kids help decorate?
Absolutely! Kids will love adding the irises and bloodshot lines.
Q5: Can I make them ahead for a party?
Yes—make and store them up to 2 days in advance. Just keep chilled until serving.
Conclusion
Creepy Eyeball Cake Pops are a spooktacular addition to any Halloween menu. With their fun design, delicious taste, and playful decorating options, they’re guaranteed to steal the spotlight at your party. They’re not only tasty little bites of cake and frosting but also edible works of art that bring Halloween magic to life. Whether you’re entertaining kids or adults, these eyeball pops are sure to get plenty of giggles—and maybe a few goosebumps too!
Creepy Eyeball Cake Pops
Course: DessertsCuisine: AmericanDifficulty: easy24
servings35
minutes1
hour25
minutes2
hoursIngredients
For the Cake Pops
1 box vanilla or chocolate cake mix (plus ingredients listed on the box)
1 cup frosting (vanilla, chocolate, or cream cheese)
For Coating and Decoration
2 cups white candy melts (for eyeball coating)
½ cup red candy melts or red gel icing (for bloodshot lines)
½ cup colored candy melts (blue, green, or brown for irises)
¼ cup black candy melts or black gel icing (for pupils)
24 lollipop sticks
1 tbsp vegetable oil (optional, for smoother chocolate melting)
Directions
- Step 1: Bake the Cake: Prepare cake mix as per package instructions. Bake and allow it to cool completely.
- Step 2: Make Cake Balls: Crumble cooled cake into fine crumbs in a large bowl. Add frosting gradually, mixing until dough-like and moldable. Roll mixture into 1-inch balls and place on a parchment-lined tray. Chill in the refrigerator for 30 minutes.
- Step 3: Insert Sticks: Melt a small amount of white candy melts. Dip one end of each stick into the melted chocolate, then insert into each cake ball (this helps secure the stick). Chill again for 10–15 minutes.
- Step 4: Coat the Cake Pops: Melt the white candy melts until smooth. Add a little vegetable oil if too thick. Dip each cake pop fully into the melted coating, allowing excess to drip off. Place upright in a cake pop stand or styrofoam block to set.
- Step 5: Decorate the Eyeballs: Use colored candy melts to create irises (dots on the center). Add black dots in the center for pupils. Pipe thin red lines with red candy melts or gel icing to create bloodshot veins. Allow cake pops to set completely.