
Introduction
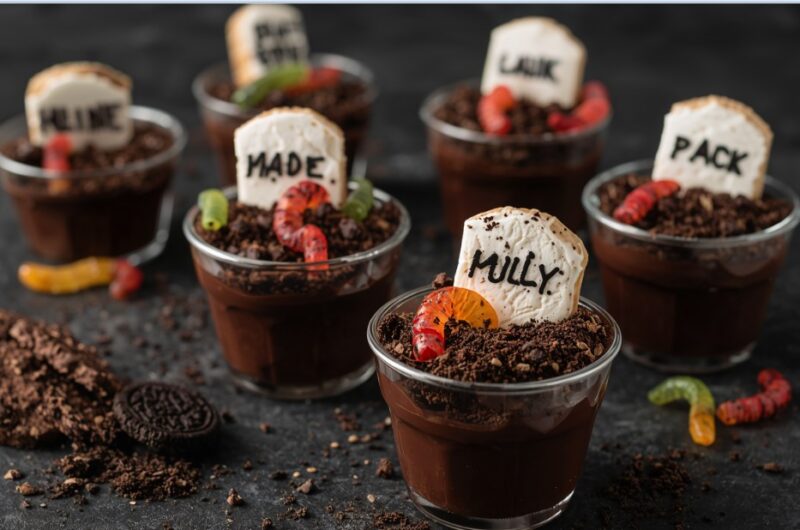
Halloween is the perfect time to get creative in the kitchen, and these Graveyard Chocolate Pudding Cups are one of the easiest and most fun desserts you can make. Layers of rich chocolate pudding, crushed Oreo “dirt,” and playful decorations like cookie tombstones and gummy worms turn simple ingredients into a hauntingly delicious treat.
What makes these pudding cups truly special is how much fun they are to decorate. Kids can help make their own spooky graveyards, and adults will love the nostalgic flavors of pudding and cookies. They’re no-bake, quick to assemble, and ideal for parties or classroom treats.
Why I Love This Recipe
I love this recipe because it’s stress-free yet festive. No oven, no complicated steps—just simple layering and decorating. The Oreo “dirt” adds the perfect crunchy contrast to creamy pudding, while the gummy worms and tombstone cookies make each cup look like a tiny edible scene.
It’s also customizable: you can make them spooky, cute, or even elegant depending on your decorations. Plus, it’s a recipe that gets everyone excited to join in and get creative.
Why It’s a Must-Try Dish
- Perfect for Halloween – They look spooky but taste delicious.
- Chocolate lovers’ dream – Creamy pudding + Oreo dirt = heaven.
- Kid-friendly & interactive – Children can help decorate their own cups.
- Quick & easy – No baking required, ready in minutes.
- Party-ready – A great make-ahead dessert for crowds.
Recipe Information
- Preparation Time: 15 minutes
- Cooking Time: 0 minutes (no-bake)
- Chill Time (optional): 30 minutes
- Total Time: 15–45 minutes
- Servings: 6 pudding cups
- Calories per serving: ~280 kcal
- Course: Dessert
- Cuisine: American
Ingredients
For the Pudding Base
- 1 package (3.9 oz) instant chocolate pudding mix
- 2 cups cold milk
- 1 cup whipped topping (like Cool Whip)
For the “Dirt”
- 20 Oreo cookies, finely crushed
For Decorations
- 6 Milano cookies or rectangular biscuits (for tombstones)
- Black or dark gel icing (to write “RIP” on tombstones)
- Gummy worms or gummy bugs
- Candy pumpkins, candy bones, or edible Halloween sprinkles (optional)
Step-by-Step Preparation Method
Step 1: Make the Pudding
- In a large bowl, whisk together pudding mix and cold milk until thickened.
- Gently fold in whipped topping until smooth and fluffy.
Step 2: Prepare the Oreo Dirt
- Crush Oreos in a food processor or place in a bag and crush with a rolling pin until fine crumbs form.
Step 3: Assemble the Cups
- Spoon pudding mixture evenly into 6 clear cups.
- Top with a thick layer of Oreo crumbs to resemble dirt.
Step 4: Decorate the Graveyard
- Write “RIP” on Milano cookies using icing to make tombstones.
- Insert a tombstone into each pudding cup.
- Add gummy worms, candy pumpkins, or bones for extra spooky detail.
Step 5: Chill & Serve
- Serve immediately, or chill in the refrigerator for 30 minutes to set.
How to Serve
- Serve in clear plastic cups so the layers of pudding and dirt are visible.
- Add a Halloween-themed spoon for extra fun.
- Great as individual desserts for parties or classroom celebrations.
Recipe Tips
- Make the Oreo crumbs fine so they resemble realistic “dirt.”
- If using whipped cream instead of Cool Whip, stabilize it with powdered sugar.
- Use piping bags for neater pudding layering.
- Want more flavor? Add a layer of crushed peanut butter cups or brownies at the bottom.
Variations
- Pumpkin Patch Cups: Use vanilla pudding tinted orange with candy pumpkins on top.
- Monster Graveyard: Add candy eyeballs peeking out from the dirt.
- Adult Version: Add a splash of Bailey’s or Kahlua to the pudding for a boozy twist.
- Gluten-Free Version: Use gluten-free sandwich cookies instead of Oreos.
Freezing & Storage
- Refrigerator: Store assembled cups in the fridge for up to 2 days (best eaten fresh).
- Freezer: Not recommended, as pudding changes texture when frozen.
- Make Ahead: Pudding can be prepared up to 1 day in advance; assemble with Oreo dirt and toppings just before serving.
Special Equipment Needed
- Mixing bowls & whisk
- Food processor (or rolling pin & bag for Oreos)
- Clear plastic cups for serving
- Piping bag (optional, for neat layering)
FAQ
Q1: Can I use homemade pudding instead of instant mix?
Yes, but make sure it’s chilled and set before assembling the cups.
Q2: Can I use another cookie instead of Oreos?
Yes, chocolate graham crackers or any dark chocolate cookie will work.
Q3: How far in advance can I make these?
You can prep pudding a day ahead, but add the Oreo dirt and decorations just before serving to keep them crisp.
Q4: Can kids help with this recipe?
Absolutely! Kids love assembling and decorating their own spooky graveyards.
Q5: What’s the best way to crush Oreos without a food processor?
Place them in a zip-top bag and crush with a rolling pin until fine.
Conclusion
These Graveyard Chocolate Pudding Cups are the ultimate Halloween dessert—creamy, crunchy, spooky, and fun to make. With minimal effort and maximum creativity, they’re the perfect party treat for kids and adults alike. Whether you keep them simple or go all out with creepy decorations, this recipe is guaranteed to be a hit at your Halloween gathering.
Graveyard Chocolate Pudding Cups
Course: DessertsCuisine: AmericanDifficulty: easy6
servings15
minutes30
minutes45
minutesIngredients
For the Pudding Base
1 package (3.9 oz) instant chocolate pudding mix
2 cups cold milk
1 cup whipped topping (like Cool Whip)
For the “Dirt”
20 Oreo cookies, finely crushed
For Decorations
6 Milano cookies or rectangular biscuits (for tombstones)
Black or dark gel icing (to write “RIP” on tombstones)
Gummy worms or gummy bugs
Candy pumpkins, candy bones, or edible Halloween sprinkles (optional)
Directions
- Step 1: Make the Pudding: In a large bowl, whisk together pudding mix and cold milk until thickened. Gently fold in whipped topping until smooth and fluffy.
- Step 2: Prepare the Oreo Dirt: Crush Oreos in a food processor or place in a bag and crush with a rolling pin until fine crumbs form.
- Step 3: Assemble the Cups: Spoon pudding mixture evenly into 6 clear cups. Top with a thick layer of Oreo crumbs to resemble dirt.
- Step 4: Decorate the Graveyard: Write “RIP” on Milano cookies using icing to make tombstones. Insert a tombstone into each pudding cup. Add gummy worms, candy pumpkins, or bones for extra spooky detail.
- Step 5: Chill & Serve: Serve immediately, or chill in the refrigerator for 30 minutes to set.