Introduction
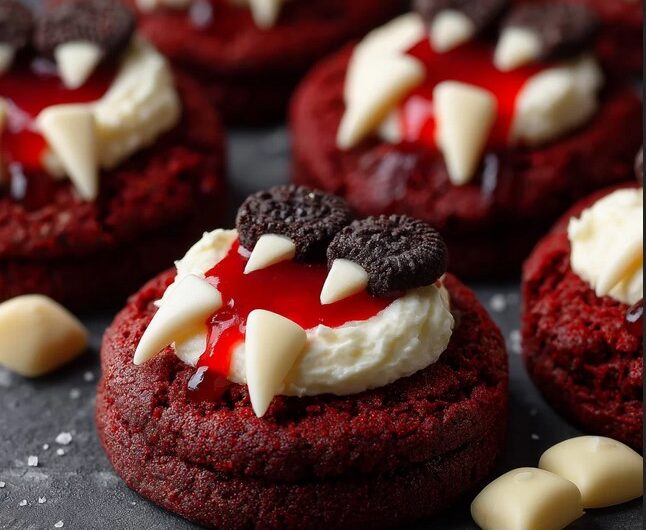
These Vampire Bite Red Velvet Cookies are the ultimate Halloween dessert—soft, chewy red velvet cookies filled with a luscious cream cheese center and decorated with “vampire bite marks” made from red gel or raspberry sauce. They look spooky with their blood-red filling but taste absolutely divine, combining the rich cocoa flavor of red velvet with the tang of cream cheese.
Perfect for Halloween parties, spooky movie nights, or a fun baking activity with kids, these cookies strike the perfect balance between creepy and delicious.
Why I Love This Recipe
I love this recipe because it’s playful and indulgent at the same time. The cookies are soft-baked, slightly chewy, and have that subtle cocoa flavor we love in red velvet. When you bite into one, you get a delightful cream cheese surprise. The finishing touch—the vampire “bite marks”—makes them look like they’re straight out of a spooky story.
It’s also a great way to elevate a simple cookie into something that’s both themed and creative, which always makes guests go “wow.”
Why It’s a Must-Try Dish
- Perfectly spooky – Halloween-ready with bloody “fang marks.”
- Delicious flavor combo – Red velvet + cream cheese filling.
- Fun for kids and adults – Decorating makes it interactive.
- Showstopper dessert – Looks impressive but is easy to make.
- Make-ahead friendly – Can be stored or frozen for later.
Recipe Information
- Preparation Time: 25 minutes
- Chilling Time: 30 minutes
- Cooking Time: 12 minutes
- Total Time: ~1 hour 10 minutes
- Servings: 18 cookies
- Calories per serving: ~210 kcal
- Course: Dessert
- Cuisine: American
Ingredients
For the Cookie Dough
- 1 ½ cups all-purpose flour
- ¼ cup unsweetened cocoa powder
- 1 tsp baking soda
- ¼ tsp salt
- ½ cup (1 stick) unsalted butter, softened
- ¾ cup granulated sugar
- ¼ cup brown sugar
- 1 large egg
- 1 tsp vanilla extract
- 1 tbsp red food coloring (gel preferred)
For the Filling
- 4 oz cream cheese, softened
- ¼ cup powdered sugar
- ½ tsp vanilla extract
For Decoration
- Red decorating gel, raspberry jam, or strawberry syrup (for “blood”)
Step-by-Step Preparation Method
Step 1: Prepare the Cream Cheese Filling
- In a small bowl, beat cream cheese, powdered sugar, and vanilla until smooth.
- Scoop into small dollops (about ½ tsp each) onto a parchment-lined tray.
- Freeze for at least 30 minutes until firm.
Step 2: Make the Cookie Dough
- In a medium bowl, whisk together flour, cocoa powder, baking soda, and salt.
- In a large bowl, beat butter, granulated sugar, and brown sugar until light and fluffy.
- Add egg, vanilla, and red food coloring; mix well.
- Gradually add dry ingredients into wet until combined.
Step 3: Assemble the Cookies
- Scoop about 1 tbsp of dough, flatten slightly, and place a frozen cream cheese dollop inside.
- Cover with another small piece of dough and roll into a ball, sealing edges.
- Place on a parchment-lined baking sheet, leaving 2 inches between cookies.
Step 4: Bake
- Bake at 350°F (175°C) for 11–12 minutes, until edges are set but centers look slightly soft.
- Cool for 5 minutes on the tray before transferring to a wire rack.
Step 5: Add Vampire Bite Marks
- Use a toothpick or straw to poke two small holes into the top of each cookie.
- Drizzle or pipe red gel/jam from the holes to look like dripping blood.
How to Serve
- Serve on a spooky Halloween platter with fake cobwebs and themed décor.
- Pair with milk or hot cocoa for a cozy, creepy treat.
- Add them to a Halloween dessert table alongside monster brownies or ghost meringues.
Recipe Tips
- Chill dough for 15 minutes if it feels sticky before assembling.
- Don’t skip freezing the cream cheese filling—it prevents melting during baking.
- Use gel food coloring for a deep, vibrant red (liquid coloring may alter dough texture).
- For extra dramatic effect, dust cookies with cocoa powder or black sanding sugar.
Variations
- Bloody Surprise Center: Add raspberry jam with cream cheese for a gooier center.
- Chocolate Lovers’ Version: Mix chocolate chips into the dough.
- Mini Cookies: Make bite-sized vampire cookies for party platters.
- Vegan Option: Use vegan cream cheese, plant-based butter, and egg replacer.
Freezing & Storage
- Room Temperature: Store in an airtight container for up to 3 days.
- Refrigerator: Keeps well for 5–6 days.
- Freezer (unbaked): Freeze filled cookie dough balls for up to 2 months. Bake from frozen, adding 2 extra minutes.
- Freezer (baked): Freeze baked cookies for up to 1 month. Thaw and decorate before serving.
Special Equipment Needed
- Electric mixer (hand or stand)
- Parchment-lined baking sheet
- Toothpick or straw (for bite marks)
- Small cookie scoop (for even cookie sizes)
FAQ
Q1: Can I skip the cream cheese filling?
Yes! You can bake plain red velvet cookies and still add vampire bite marks for decoration.
Q2: Can I make these ahead?
Yes, assemble dough balls and refrigerate overnight before baking.
Q3: My cookies spread too much—why?
Likely too much butter or warm dough. Chill dough before baking to prevent overspreading.
Q4: Can I use beet powder instead of food coloring?
Yes, natural alternatives like beet powder or pomegranate juice work, but color may be less vibrant.
Q5: Can kids help make these?
Absolutely—they’ll love poking the bite marks and adding the “bloody” drips.
Conclusion
These Vampire Bite Red Velvet Cookies are a spooky twist on a classic favorite. With their striking color, creamy filling, and dramatic decoration, they’re both delicious and visually stunning. Perfect for Halloween parties, trick-or-treat trays, or a fun night of baking, these cookies are guaranteed to wow guests and bring a little spooky magic to your table.
Vampire Bite Red Velvet Cookies
Course: DessertsCuisine: AmericanDifficulty: easy18
servings25
minutes42
minutes1
hour7
minutesIngredients
For the Cookie Dough
1 ½ cups all-purpose flour
¼ cup unsweetened cocoa powder
1 tsp baking soda
¼ tsp salt
½ cup (1 stick) unsalted butter, softened
¾ cup granulated sugar
¼ cup brown sugar
1 large egg
1 tsp vanilla extract
1 tbsp red food coloring (gel preferred)
For the Filling
4 oz cream cheese, softened
¼ cup powdered sugar
½ tsp vanilla extract
For Decoration
Red decorating gel, raspberry jam, or strawberry syrup (for “blood”)
Directions
- Step 1: Prepare the Cream Cheese Filling: In a small bowl, beat cream cheese, powdered sugar, and vanilla until smooth. Scoop into small dollops (about ½ tsp each) onto a parchment-lined tray. Freeze for at least 30 minutes until firm.
- Step 2: Make the Cookie Dough: In a medium bowl, whisk together flour, cocoa powder, baking soda, and salt. In a large bowl, beat butter, granulated sugar, and brown sugar until light and fluffy. Add egg, vanilla, and red food coloring; mix well. Gradually add dry ingredients into wet until combined.
- Step 3: Assemble the Cookies: Scoop about 1 tbsp of dough, flatten slightly, and place a frozen cream cheese dollop inside. Cover with another small piece of dough and roll into a ball, sealing edges. Place on a parchment-lined baking sheet, leaving 2 inches between cookies.
- Step 4: Bake: Bake at 350°F (175°C) for 11–12 minutes, until edges are set but centers look slightly soft. Cool for 5 minutes on the tray before transferring to a wire rack.
- Step 5: Add Vampire Bite Marks: Use a toothpick or straw to poke two small holes into the top of each cookie. Drizzle or pipe red gel/jam from the holes to look like dripping blood.