4 People
15 mins
20 mins
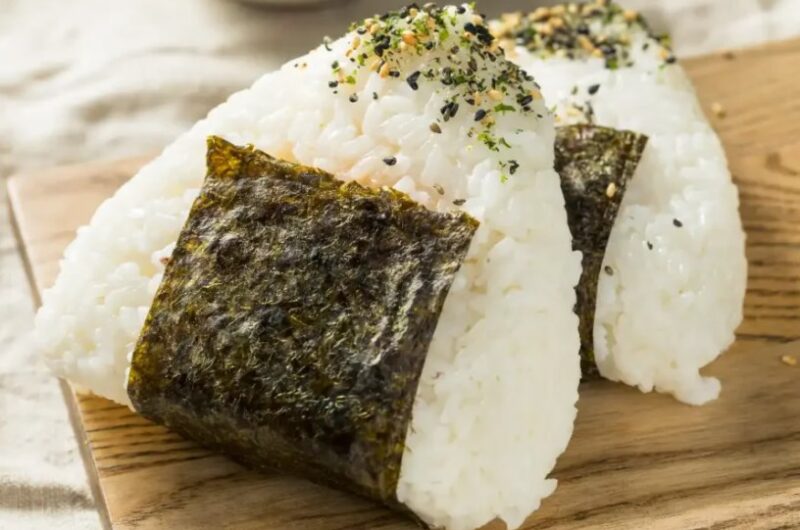
Tuna Mayo Onigiri Rice Balls are one of my go-to snacks when I’m looking for something quick, flavorful, and portable. These delightful little rice balls are not only easy to prepare, but they also pack a punch in terms of taste.
The combination of creamy tuna and fluffy rice, held together by a strip of nori, offers a satisfying bite that’s perfect for lunchboxes or picnics.
What I love most about these onigiri is their versatility. You can easily customize the filling by adding ingredients like diced cucumber, avocado, or even spicy mayo for those who enjoy a bit of a kick.
They are a fantastic option for meal prep, as you can whip up a batch at the beginning of the week and enjoy them throughout the week.
These rice balls are wonderful for any occasion, whether you’re heading to a picnic in the park, packing a lunch for work, or just craving a quick snack. With just a little preparation, you can enjoy homemade Tuna Mayo Onigiri Rice Balls that are far superior to store-bought alternatives.
Why You’ll Love This Recipe
Tuna Mayo Onigiri Rice Balls are a fantastic addition to your recipe arsenal for several reasons:
- Quick and Easy: This recipe can be prepared in about 30 minutes, making it a perfect choice for busy days.
- Customizable: You can alter fillings to suit your tastes, allowing for endless variations.
- Portable: These rice balls are easy to pack and eat wherever you are, whether at home, work, or out and about.
- Budget-Friendly: The ingredients are quite affordable, making it a great choice for family meals or snacks.
- Delicious! The creamy tuna combined with the fluffy rice and nori creates a satisfying flavor experience.
The Appeal of Tuna Mayo Onigiri
Tuna Mayo Onigiri is not just about convenience; it’s also about taste and texture. The creamy tuna mixed with mayonnaise balances perfectly with the fluffy rice, while the seaweed adds a pleasant umami flavor. I find them perfect for any time of day, whether I want a quick breakfast, a light lunch, or a satisfying snack.
This dish is also incredibly customizable! Depending on my mood, I can add various ingredients to the filling, making it a creative outlet every time I prepare them. Plus, they are delightful little packages of flavor that can be eaten on-the-go, making them practical for busy lifestyles.
Recipe Summary
This recipe for Tuna Mayo Onigiri is straightforward and requires minimal ingredients. You’ll need sushi rice, canned tuna, mayonnaise, nori (seaweed), and any optional extras you wish to add. The entire process takes about 30 minutes from start to finish, making it an easy choice for meal prep or a quick snack.
By the end of this, you’ll have perfectly shaped rice balls that are not only tasty but also portable. I will guide you step-by-step to ensure that your onigiri turns out delicious every time!
Nutritional Information
Each Tuna Mayo Onigiri Rice Ball is not only delicious but also relatively balanced. While the calories can vary depending on the filling and preparation method, here’s a general nutritional breakdown for one rice ball:
- Calories: Approximately 200-250 calories.
- Protein: 10-15 grams primarily from the tuna.
- Carbohydrates: Around 30-35 grams from the rice.
- Fat: About 5-10 grams, mainly from the mayonnaise.
- Fiber: 1-2 grams if you opt for brown rice.
This nutritional profile makes Tuna Mayo Onigiri a great choice for a light meal or snack without compromising on flavor. Additionally, by using brown rice, you can increase the fiber and nutrient content.
Ingredients Overview
For this Tuna Mayo Onigiri, you’ll need a few essential ingredients:
- Sushi Rice: The foundation of any great onigiri. Short-grain sushi rice holds together nicely, giving you that sticky texture that’s perfect for molding.
- Canned Tuna: I recommend using high-quality canned tuna in water or oil for a better flavor. Opt for chunk light tuna to achieve a nice texture.
- Mayonnaise: For creaminess and flavor, a Japanese mayonnaise like Kewpie is preferable, but any mayonnaise will work.
- Nori: This seaweed provides that distinctive Japanese touch and flavor, wrapping around the onigiri for a tasty bite.
- Optional Extras: Feel free to add diced vegetables like cucumber or avocado for extra crunch and nutrition.
How to Make Tuna Mayo Onigiri
Here’s a simple step-by-step guide to making these delightful rice balls:
- Prepare the Rice: Rinse 2 cups of sushi rice until the water runs clear, then cook it according to package instructions, ideally using a rice cooker for best results.
- Make the Filling: In a bowl, mix drained canned tuna with mayonnaise. You can also add diced cucumber, avocado, or even a splash of soy sauce for extra flavor.
- Shape the Rice Balls: Once the rice has cooled slightly, wet your hands with water to prevent sticking. Take a handful of rice and flatten it into a disc shape, placing a spoonful of tuna filling in the center.
- Form the Onigiri: Gather the edges of the rice around the filling and mold it into your preferred shape (triangular or oval), pressing gently but firmly to ensure it holds together.
- Wrap with Nori: Cut nori sheets into strips and wrap them around the rice ball. Enjoy immediately or store in an airtight container.
Ingredients
2 cups sushi rice
2 ¼ cups water
1 can tuna in water, drained 5 oz
¼ cup mayonnaise
1 tablespoon soy sauce
1 teaspoon sesame oil
¼ teaspoon salt
¼ teaspoon pepper
4 sheets nori, cut in half
Directions
- Rinse the sushi rice under cold water until the water runs clear. This removes excess starch.
- In a rice cooker or pot, combine the rinsed rice and 2 ¼ cups water. Cook according to rice cooker instructions or bring to a boil, then reduce heat and simmer for 18-20 minutes until the water is absorbed.
- While the rice is cooking, prepare the tuna filling. In a mixing bowl, combine the drained tuna, mayonnaise, soy sauce, sesame oil, salt, and pepper. Mix until well combined.
- Once the rice is done, let it cool slightly. Wet your hands to prevent sticking, and take about ½ cup of rice. Flatten it into your palm and create a small indentation in the center.
- Spoon about 1 tablespoon of tuna filling into the indentation, then mold the rice around it to form a triangular shape.
- Wrap a half sheet of nori around the bottom of each rice ball for easy handling. Repeat with the remaining ingredients.
- Serve immediately or wrap in plastic wrap for later use.
Expert Tips for Making the Best Onigiri
- Use Wet Hands: Wetting your hands while shaping the rice helps prevent sticking and keeps the balls neat and smooth.
- Cooling the Rice: Allow the rice to cool slightly before shaping; hot rice can be difficult to mold and can cause burns.
- Experiment with Fillings: Feel free to get creative! Try different flavors, textures, and seasonings to suit your taste buds.
- Wrap At Serving Time: If you’re preparing these for later, consider wrapping them in nori just before serving to keep it crunchy.
Serving Suggestions
Tuna Mayo Onigiri is delicious on its own, but you can enhance your meal by serving it with a side of pickled vegetables, miso soup, or a simple salad. I also enjoy pairing them with green tea for a refreshing balance. If you’re having a picnic, these rice balls can be a part of a larger bento box that includes fruits, vegetables, and maybe a sweet treat for dessert.
Variations and Substitutions
If you’re feeling adventurous, here are some variations to try:
- Spicy Tuna: Add Sriracha or chili oil to the tuna filling for a spicy kick. This variation is perfect for those who love heat!
- Veggie Lover’s Onigiri: Swap tuna with mixed vegetables, avocado, or tofu for a vegetarian option that’s equally satisfying.
- Different Proteins: Use chicken salad, shrimp, or other proteins in place of tuna if desired for a unique twist.
Storing and Reheating
Tuna Mayo Onigiri is best enjoyed fresh, but if you have leftovers, store them in an airtight container in the refrigerator for up to 2 days. Reheat them in a microwave for a few seconds if desired, though note that the nori may lose its crispness. To maintain their original texture, I recommend enjoying them at room temperature or cold.
FAQ
Q: How long can I store Tuna Mayo Onigiri?
A: You can store them in an airtight container in the refrigerator for up to 2 days.
Q: Can I use brown rice instead of white?
A: Yes, brown rice can be used, but it will require more water and a longer cooking time.
Q: What else can I put in the filling?
A: You can add diced avocado, cucumber, pickles, or even different proteins like chicken or tofu.
Q: Is this recipe gluten-free?
A: Yes, as long as you use gluten-free mayonnaise and ensure that the nori is pure.
Q: Can I freeze these rice balls?
A: While you can freeze them, it’s best to eat them fresh. If frozen, thaw them in the fridge before eating.
Tuna Mayo Onigiri Rice Balls
Course: LunchCuisine: JapaneseDifficulty: Easy4
servings15
minutes20
minutes35
minutesIngredients
2 cups sushi rice
2 ¼ cups water
1 can tuna in water, drained 5 oz
¼ cup mayonnaise
1 tablespoon soy sauce
1 teaspoon sesame oil
¼ teaspoon salt
¼ teaspoon pepper
4 sheets nori, cut in half
Directions
- Rinse the sushi rice under cold water until the water runs clear. This removes excess starch.
- In a rice cooker or pot, combine the rinsed rice and 2 ¼ cups water. Cook according to rice cooker instructions or bring to a boil, then reduce heat and simmer for 18-20 minutes until the water is absorbed.
- While the rice is cooking, prepare the tuna filling. In a mixing bowl, combine the drained tuna, mayonnaise, soy sauce, sesame oil, salt, and pepper. Mix until well combined.
- Once the rice is done, let it cool slightly. Wet your hands to prevent sticking, and take about ½ cup of rice. Flatten it into your palm and create a small indentation in the center.
- Spoon about 1 tablespoon of tuna filling into the indentation, then mold the rice around it to form a triangular shape.
- Wrap a half sheet of nori around the bottom of each rice ball for easy handling. Repeat with the remaining ingredients.
- Serve immediately or wrap in plastic wrap for later use.


